We did this activity maybe about a month ago (eeks, has it been that long?!) Anyway, I wouldn’t say we were particularly successful with this attempt but we really tried our best and my little one had fun so yeah, I think it was still worth it. 😀
I used shaving foam, poster paints, drawing block cut to shapes (you can cut it into any shape you want do the cutting after the paint has dried), a few toothpicks for marbling and a few craft sticks (for scrapping the excess foam off).
First, squirt out shaving foam onto a tray and try to level the foam with a craft stick. Then I let her choose the colours she wanted and let her squeeze the paint onto the shaving foam.
Before marbling
Then use a toothpick and go mix up the colours and start marbling (but don’t over mix).
Press a sheet of the drawing paper onto the shaving foam lightly.
Then scrape off the excess foam. I found that everything looked so beautiful until I scrape off the excess foam because I ended up pulling along the paint as well and some parts lost the marbling effect and looked rather like just scraped paint. Sigh. Oh well. Anyway, after the whole shaving foam marbling art pieces were done, she had to play with the shaving foam.
She mixed up the colours with the craft stick:
Twirled it all onto the craft stick and held it up and shouted, “Hey, mummy! Look, I can hold up the shaving foam on the stick!”
And after that it was just plain ol’ fun – squishing shaving foam with her hands.
Let me know if you have more luck with shaving foam marbling art! 🙂
If you enjoyed this post, please share your thoughts in the comments or share the post with your friends by clicking on the social media buttons below. Do hop over to my Facebook page where I connect with my readers and I would love to have you following me on Pinterest, Twitter and Instagram too 🙂
When the Philips Viva Collection AirFryer was launched in 2011 and created a whole new way for people to enjoy tasty food with less/ no oil, I started to secretly covet it. But my hubby said it sounded too good to be true. How can tasty food and traditionally deep-fried food taste good if not fried in a wok full of oil? And so I continued to long for the airfryer until… my dream finally came true! You can imagine my exhilaration when I managed to get the Philips Avance AirFryer to review!
So how different is The Philips Avance AirFryer compared to the previous model? It’s BIGGER and better, boasting of 50% more capacity – it was developed in direct response to consumer’s feedback for greater capacity, versatility and performance. With the Rapid Air Technology, aside from frying, you can also grill, roast , gratinate and bake a variety of dishes! With the digital timer and controls, greater accuracy in time and temperature means cooking foods at the perfect setting for the best tasting results.
When I received the Airfryer, I opened the box immediately. And I had to cook at least part of my dinner with it although it arrived just before dinner time. 🙂 Yes, I’m in love. You can tell.
The very first thing I cooked with my Airfryer? – Grilled salmon because I happened to have that on the menu that evening. Oh it was so good! Marvelously tender and succulent inside! And the best part was that I didn’t even need to oversee the cooking. Just preheat the Airfryer (add a couple of minutes to the cooking time if not preheating), pop the food in and voila, salmon grilled to perfection. 🙂 Life has just gotten easier and not to mention healthier as not a single drop of oil was used!
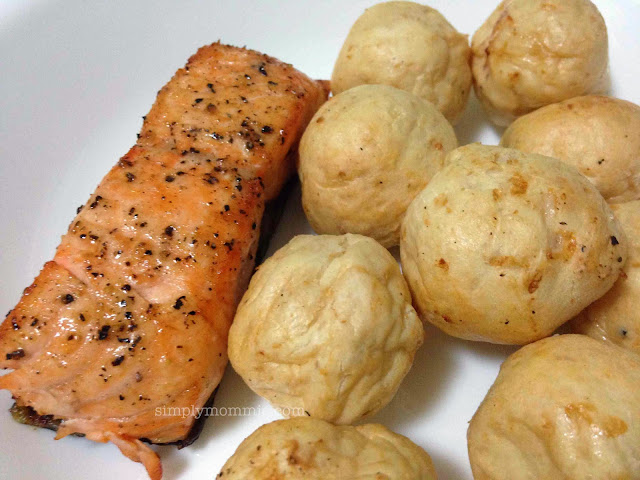
On another occasion, I placed a slab of salmon in together with a packet of sotong balls. As you can see, it turned out beautifully and note that though this photo appeared on my Instagram awhile ago, I didn’t use any filter at all – the perfect golden brown you see is reality.
Actually I longed for the Airfryer because I really love deep-fried food. But I hardly cook any at home because I’m … stingy (there! I said it out loud! Phew!) and I can’t part with the vast amount of oil to be used for frying. Besides, I can’t get past the guilt of using all that oil, knowing how much oil the food I cooked it in will absorb. Even though I’m a mum – and not that skinny young girl I used to be, I still want to be a yummy mummy. 🙂 And also precisely because I have been elevated to the status of mum, I need to make sure that my family, especially the little ones, eat right. I’m glad to know that with the new Philips Avance AirFryer, I can cook more family favorites with up to 80 percent less fat!
The taste of the grilled salmon didn’t fully convince hubby of the power of the
Airfryer because it wasn’t something that we would normally eat deep-fried, though we established the fact that it certainly can grill. So of course I had to put it to the test by cooking lemon sauce chicken cutlet rice (recipe found at the end of the post).
After tasting it, the hubby had absolutely no more doubts about the Airfryer. The skin of the chicken cutlet was super crispy and the meat was moist and succulent. Indeed, ‘Air is the new oil’.
I also tried out one of the recipes for a refreshing dessert from the recipe book that comes with the Airfryer – fried pineapple with honey and coconut:
At the launch of the Philips Avance XL AirFryer, I also had a chance to taste cuttlefish toast made with the Airfryer – I’ve always wanted to cook prawn toast but have been put off by the oil that will be absorbed by the bread. I can now happily say that I can finally cook it at home without the oil, the sin and the guilt!
Again, #nofilter or any sort of enhancement
So you see, if you’re thinking that the Philips Airfryer can only cook frozen foods like fries and nuggets perfectly, then you ought to change that impression you have of it. There’s so much you can do with the Airfryer – your imagination is the limit!
I’d have to admit though, that the only limitation of the Airfryer is that it cannot fry food with wet batter, but really, it has already made life and cooking so much easier and not to mention, healthier! Plus the stingy side of me is extremely happy to note that oil consumption in the house has slowed down!
Are you convinced yet? 🙂
P.S. The Philips Avance XL Airfryer will be available in their Philips Experience Showroom, and nationwide retail stores from December onwards.
Cook with Air today! Quote Simply Mommie and buy the Philips Viva Digital Airfryer at $399 (Usual price: $459), FREE $50 SHOPPING VOUCHER and Philips Avance XL Airfryer at $479 (Usual price: $539), FREE $50 SHOPPING VOUCHER at the PHILIPS EXPERIENCE SHOWROOM.
This promotion is valid from 1st December till 31st January 2014.
The Philips Viva Digital Airfryer and Philips Avance XL Airfryer are also available at regular price in leading electronics stores, departmental stores and supermarkets island-wide.
*Limited to 1 Airfryer per person (IC must be produced). PHILIPS EXPERIENCE SHOWROOM Address: 620A Lorong 1 Toa Payoh Building TP4 Level 1 S(319762) Tel: 6882 5800
Opening Hours: Monday to Friday: 9.00 am – 7.00 pm Saturday: 9.00 am – 1.00 pm. Closed on Sundays and Public Holiday
And here’s the recipe as promised, and if you like one-dish meals, click the link for a complete list of one-dish meals (with thumbnails) on the blog.
Air-fried chicken cutlet served with lemon sauce and rice.
Ingredients
4 chicken thighs
corn flour for coating the chicken thighs
1-2 tablespoons oil (for brushing on the chicken thighs)
Marinade for the chicken:
2 tablespoons oyster sauce
2 tablespoons chicken marinade
black pepper
1 teaspoon hua diao jiu
1 teaspoon sesame oil
Lemon Sauce:
Rind of half a lemon
Juice of 1 lemon
Juice of 1 lime
4-6 teaspoons sugar
1 tablespoon honey
6 tablespoons water
corn flour slurry (corn flour + water)
Instructions
Marinate chicken thighs with marinade ingredients, preferably overnight.
Preheat the airfryer to 200 degC.
Remove the chicken thighs from the marinade and coat with cornflour. Brush a little oil on the chicken.
Airfry at 200degC for 10 min (skin side down), then flip the chicken thighs, brush with a little oil and airfry at 180degC for 10min.
While the chicken is being air-fried, prepare the lemon sauce - combine all the ingredients (except corn flour slurry) in a saucepan and bring it to a boil. Adjust according to your own preferred taste then add in cornflour slurry to thicken the sauce.
Serve the chicken cutlet with rice, preferred vegetables and the lemon sauce.
Notes
The chicken cutlet was so good that it wasn't enough for us (2 adults + 2 children), so I'd have to increase the number of chicken thighs used in future.
3.2.2124
Disclosure: This is an advertorial but all opinions are 100% mine.
Hi! I'm Angie and I'm thrilled to have you here! More than just a place where I share my parenting thoughts, recipes and home-learning activities, my blog has enabled me to embark on a remarkable journey of self-discovery and of the world I thought I knew. Read more about me and happy browsing!


 Then scrape off the excess foam. I found that everything looked so beautiful until I scrape off the excess foam because I ended up pulling along the paint as well and some parts lost the marbling effect and looked rather like just scraped paint. Sigh. Oh well. Anyway, after the whole shaving foam marbling art pieces were done, she had to play with the shaving foam.
 And after that it was just plain ol’ fun – squishing shaving foam with her hands.
 Let me know if you have more luck with shaving foam marbling art! 🙂

 Actually I longed for the Airfryer because I really love deep-fried food. But I hardly cook any at home because I’m … stingy (there! I said it out loud! Phew!) and I can’t part with the vast amount of oil to be used for frying. Besides, I can’t get past the guilt of using all that oil, knowing how much oil the food I cooked it in will absorb. Even though I’m a mum – and not that skinny young girl I used to be, I still want to be a yummy mummy. 🙂 And also precisely because I have been elevated to the status of mum, I need to make sure that my family, especially the little ones, eat right. I’m glad to know that with the new Philips Avance AirFryer, I can cook more family favorites with up to 80 percent less fat!
 I also tried out one of the recipes for a refreshing dessert from the recipe book that comes with the Airfryer – fried pineapple with honey and coconut:


 Facebook
 Twitter
 Pinterest
 Instagram