Easter egg hunt

easter egg hunt

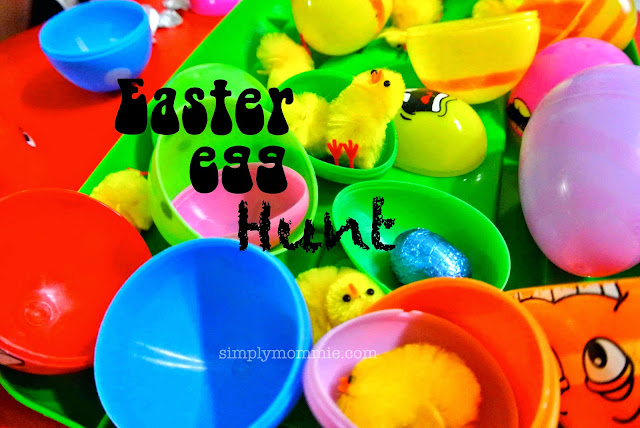
It’s the time of the year where cute little chocolate eggs can be found in all supermarkets. Needless to say, we couldn’t resist picking up a bag of those and since I still had the plastic eggs from a couple of years back (when I did up the Easter egg word families) plus some chicks, I put together a quick easter egg hunt once we got back from the supermarket.

Cute chicks – check! Plastic eggs – check! Chocolate eggs – check!

Since it was already night, I hid the eggs all over the house instead of venturing outdoors. In any case, I doubt we’d play this game outdoors as I wouldn’t want the billions of ants outdoors to get to the chocolate before the kids do!

In six of the plastic eggs I put chocolate eggs and in the remaining eggs, I put chicks.

Each time they found an egg, my girl would hold it in her hand, shake it and based on the weight and sound declare what they’d found. There would be a squeal of delight when a chocolate egg was found while a little sigh when it was a chick.

They weren’t allowed to open the eggs until all the eggs had been found. Eventually when they found the eggs, they worked through all the eggs at lightning speed. The power of chocolate – you see, they only have chocolates on special occasions so this was definitely a treat!

Fixated on opening the wrapper. A rare moment of silence in the house.

Really trying very hard.

We subsequently played this game a few more times – and even without the bait of chocolate eggs, my little girl still loves to play this game! It’s fun, takes about 5 minutes to set up and you get at least 10 minutes to drink your coffee! Bonus – treat yourself to some chocolate while you’re at it. πŸ™‚

~~~~~~~~~~~~

If you enjoyed this post, please share your thoughts in the comments or share the post with your friends by clicking on the social media buttons below. Do hop over to my Facebook page where I connect with my readers and I would love to have you following me on Pinterest, Twitter and Instagram too πŸ™‚

gerry rhymes

Posted in Homeschooling | Leave a comment

Washi tape ideas: Clothespin color and pattern matching

As you know, my little ones have been fascinated with colourful and patterned pretty tapes lately ever since they attended a crafty tea party with me.

Life has never quite been the same since they’ve been exposed to those tapes so instead of just letting them tape mindlessly, I decided that I’d put the tapes to good use.

I saw a clothespin colour matching idea and thought that I could make these washi tapes work for me! And because these tapes not only come in solid colours, they are available in a gazillion patterns which make things so much more exciting for this activity!

washi tape ideas

Strengthening the little finger muscles are so crucial for learning to write for young children so I’ve actually been concentrating more on working on developing my tot’s fine motor skills. This activity is really quite a gem, considering (1) it’s easy to prepare (2) it’s small and light to carry around as a busy bag activity (3) it’s a swell fine motor skills activity (4) he gets to practise recognising colours and patterns (5) I get to add this to my list of washi tape ideas. Win-win on so many counts.

So what do you need?

  • a mixture of solid colour and patterned tapes
  • plain craft sticks/ tongue depressors
  • wooden clothespins
  • a pair of scissors

Cover one side of the craft stick with tape. You can choose to cover the entire craft stick with tape – that is fine but quite a waste of tape. I had tried to tape the entire side of the clothespins for the first few I made but in the end decided that it was too time consuming and by taping only the front of the clothespin, it brings focus to the pattern/ colour. That, of course, is the whole point so yes, I managed to justify my laziness and saved some time there!

My boy loved it and he still asks to play with these, especially during lull periods like during lunch time at home or just after lunch (when I’m feeling a bit sleepy). Works out great for us!

He uses his right hand most of the time for doodling/ eating and when it came to using the clothespins, he very naturally used his right hand first too:

But he also tried the activity out with his left hand:

I actually lined the two sides of the clothespins with different patterns to save on the number of clothespins I had to use/ bring out on trips. I still think it’s a good idea as it adds another level of difficulty for him to notice that that’s not the right colour/ pattern and to turn the clothespin around to check.

Checking the design of the tape on the clothespin

I totally loved his concentration as well as how those little fingers looked as they worked hard pegging.

You don’t need to make too many of these and you can always rotate out the colours and patterns by peeling off the tapes easily without damaging the clothespins or craft sticks.

My girl (5.5 years old) decided that these worked better for her as aeroplanes when she came home from class that day as she took a clothespin and clipped the craft stick right through the centre portion. Yup, it did look like a gorgeous plane! πŸ™‚

Have fun taping!

Click the link for more fine motor skills activities!

~~~~~~~~~~~~

If you enjoyed this post, please share your thoughts in the comments or share the post with your friends by clicking on the social media buttons below. Do hop over to my Facebook page where I connect with my readers and I would love to have you following me on Pinterest, Twitter and Instagram too πŸ™‚

Posted in Fine Motor Skills, Homeschooling, Teaching Math | Leave a comment